
If you are used to working in other applications such as Microsoft Word, Excel, or PowerPoint, you likely think of a font simply as a text style you pick from a dropdown menu. In those applications, the computer handles the spacing automatically, and the exact placement of text rarely breaks the layout.
In professional design tools like Adobe InDesign and InCopy, however, fonts act more like specific building blocks. Because teams work on the same shared layout in Vicosight, everyone must have the exact same font version installed to ensure the design looks consistent for everyone.
Why Matching Fonts Matter
When a designer creates a text frame in InDesign, they tailor it perfectly to the specific widths, heights, and spaces of the chosen font. If your computer doesn't have that exact font file installed when you open the document in InCopy/InDesign, your system has to guess. It automatically substitutes a temporary font (like Arial or Calibri) so you can still read and edit the text.
Because the substitute font has different dimensions, it often causes two common issues:
- Overmatter (Text Overflow): The temporary font might be slightly wider than the original. This pushes your text outside the boundaries of the designed frame, hiding the end of your sentence.
- Inaccurate PDFs: When you save your changes, the PDF generated in Vicosight will use the substitute font, making the layout look broken or unaligned to other reviewers.
Keep in mind: Missing the specific font won't prevent you from typing, modifying, or saving your work. Your computer simply uses a temporary visual replacement, so the core layout remains intact even if it looks a bit different for now.
How to Spot a Missing Font
InCopy/InDesign are designed to help you quickly identify when a font is missing. If you don't have the correct file installed, you will notice three visual cues:
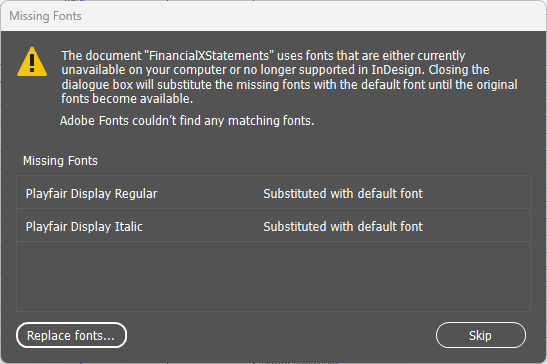
1. The Missing Fonts Warning
When you first open the document, a pop-up dialogue box will appear. This isn't an error message telling you that you did something wrong – it is simply a helpful list showing you which fonts the designer used that your computer doesn't currently have.
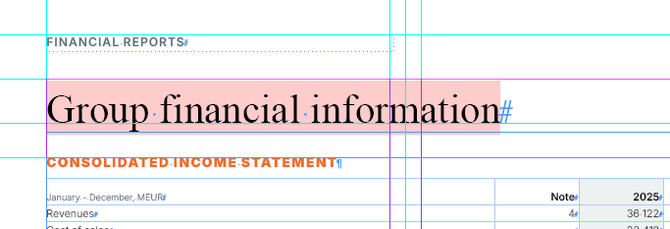
2. The Pink Highlight
If you are working in Normal View, InCopy/InDesign will highlight any text using a substituted font in bright pink. This acts as a visual flag, reminding you that the text spacing you see on your screen might look slightly different on the designer's screen.
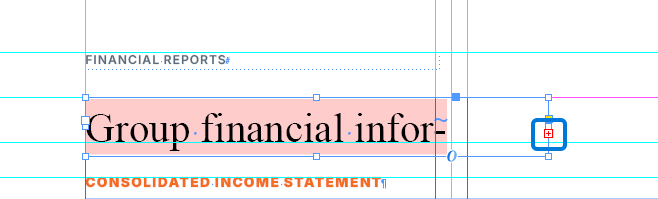
3. The Overmatter Indicator
If the substituted font forces your text to overflow the frame, a small red [+] symbol will appear at the bottom right corner of the text box. This indicates that some text is hidden because it has run out of space.
How to Resolve Missing Fonts
To fix a missing font, you must use the exact same font source as your design team. Even if a font has the exact same name in the Adobe Cloud as a local file on your computer, InCopy/InDesign treats them as two completely different fonts.
Follow these two steps to resolve font issues in your collaborative project:
1. Match your designer's font source: Reach out to your design team or project manager to find out how they applied the fonts, and follow their lead:
- If they used local font files: Ask them to send you the specific files so you can install them on your computer. (Note: We do not recommend using variable versions of fonts as we have seen them cause issues in the workflow. Always use static font files).
- If they used Adobe Fonts: Activate those exact fonts through your Adobe Creative Cloud account. (Note: If your company uses a third-party font management tool, follow your internal instructions to activate the requested fonts).
Avoid font conflicts: Make sure you do not have the same font installed locally and activated via Adobe Fonts at the same time. Having both active at once confuses the software and can cause issues.
2. Install and Restart
Install any received files onto your operating system (Windows or Mac), then restart InCopy/InDesign to automatically detect the new fonts.
Once restarted, InCopy/InDesign will automatically detect the correct files. The pink highlights will disappear, the text will fit perfectly within its frames, and your screen will exactly match the original design.